
Hello, lovely. I'm back with a new post. However, this isn't a normal post.
In honor of WNS coming back I'm asking for help from the talented woozens who read the blog! I've been having some terrible art block and I need some fresh ideas for tutorials and how-to's. Message me on woozworld @LincolnWoooz (Mind the three o's).
Let's get started shall we?
Today i'll be teaching you a simple edit that's most appropriately categorized as "acoustic". You can choose any acoustic instrument, varying from electric guitars to ukuleles.(The speed edit video)
What you'll need:

This should be how your layers panel should look initially. Notice how I named each layer. You can name them whatever you want, just don't leave the names as "Layer-(number)".
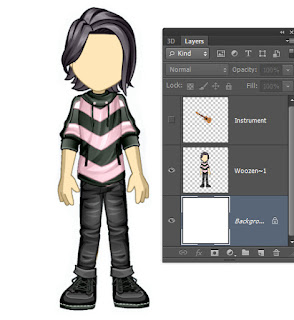
Hide your "instrument" layer by pressing the eye symbol to the left of it.
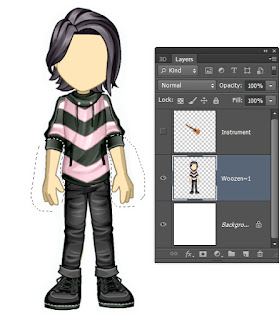
With your "Woozen" layer selected, make two cuts on each FOREARM.
Today i'll be teaching you a simple edit that's most appropriately categorized as "acoustic". You can choose any acoustic instrument, varying from electric guitars to ukuleles.(The speed edit video)
What you'll need:
- Basic understanding of the pen tool
- Basic understanding of layers
- An image of an acoustic image with a transparent background.
- A picture of your woozen facing forward.
HOW TO DO IT

This should be how your layers panel should look initially. Notice how I named each layer. You can name them whatever you want, just don't leave the names as "Layer-(number)".

Hide your "instrument" layer by pressing the eye symbol to the left of it.

With your "Woozen" layer selected, make two cuts on each FOREARM.

Right-click and "layer via cut"

This is what your layers panel should look like.

With the "forearms" layer selected, cut out the right forearm with the lasso.

RIght click and select "Layer via cut"

Re-name the layers. This is what your layers panel should look like.

Move both the right and left forearm layers on top of the "Instrument" layer.

Make the "Instrument" layer visible by pressing the eye symbol on the left.

Adjust everything so that it looks natural. This can be done with the "free transform" option in the "Edit" drop-down menu.
That's all for today! Remember, stay creative my friends.


No comments:
Post a Comment